Both dealers and property managers on a Remote Management site are able to move out tenants.
To get started, navigate to https://aiphone.cloud/remotemanagement and log in with your credentials, including the branch's IXG Portal account, if prompted. If multiple sites are displayed, click the desired site from the list.
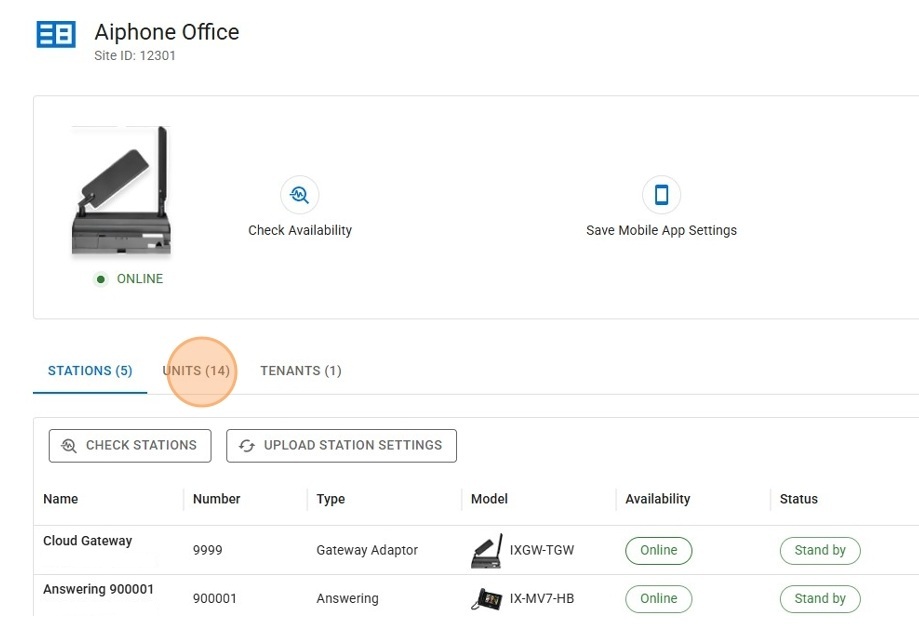
On the Site Detail page, click Units to display the unit list.
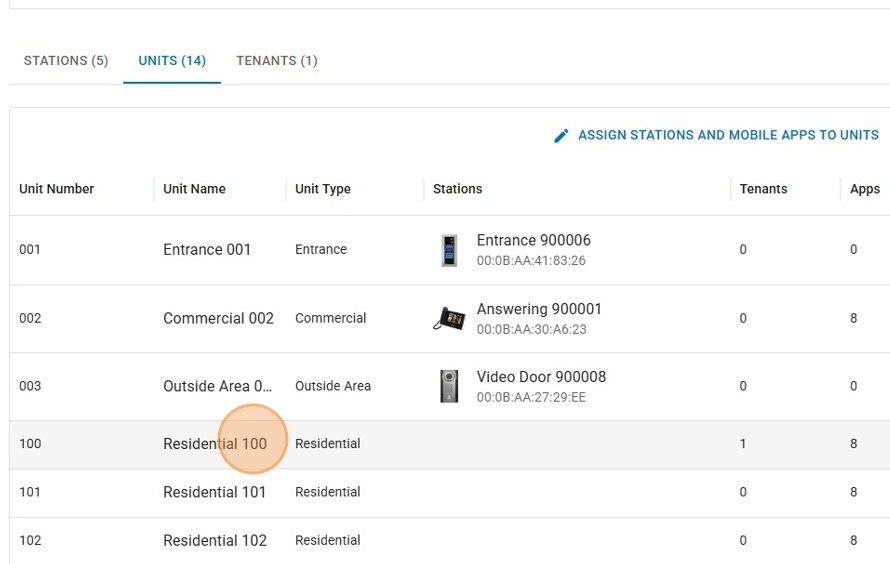
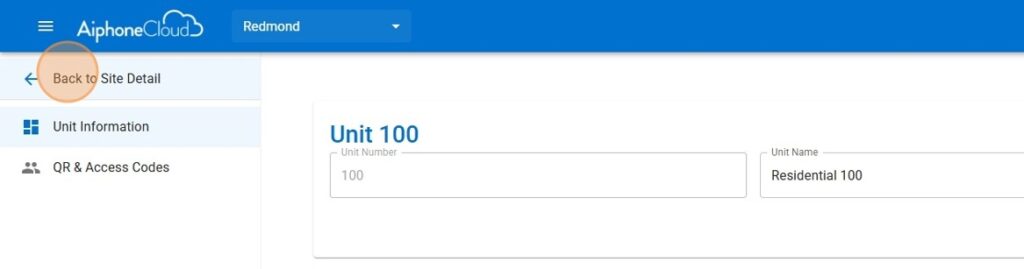
Click a unit from the list. This will open up a new page.
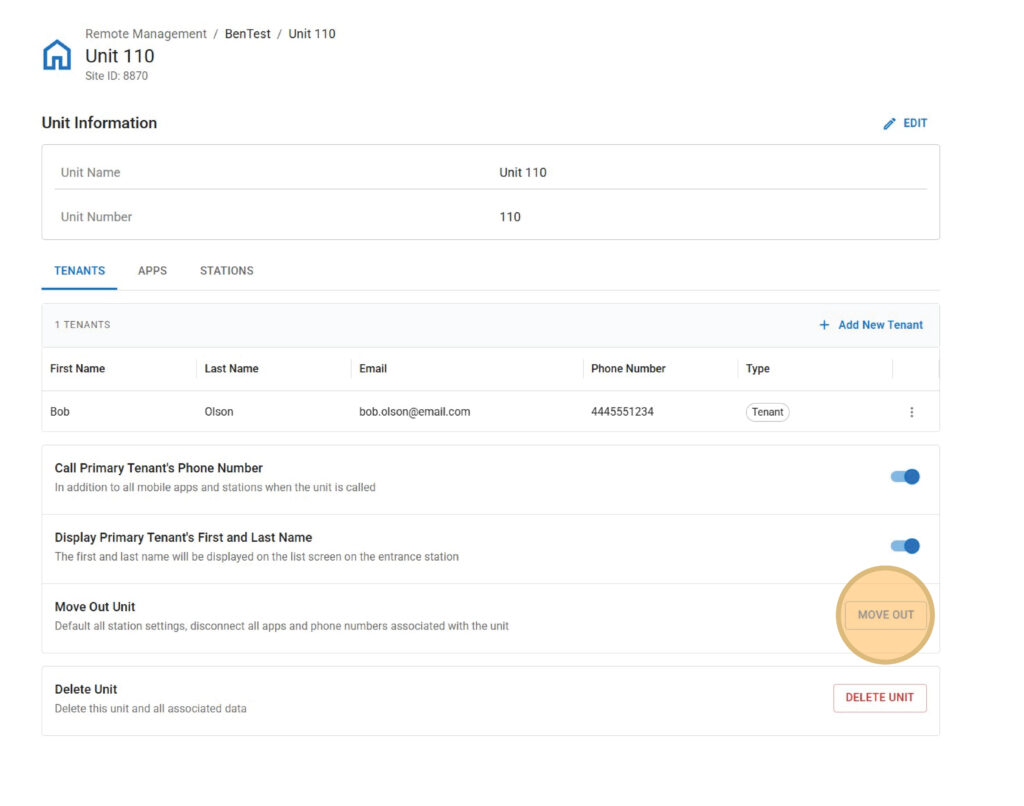
Under the Tenants submenu, the site’s tenants will be listed. Click Move Out.
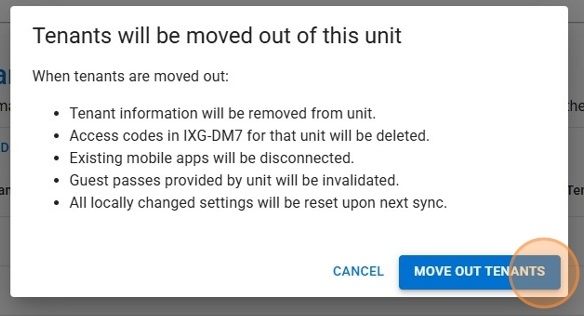
A pop-up window will appear, explaining what information will be lost once the tenant is moved out. Click Move Out Tenants to confirm.
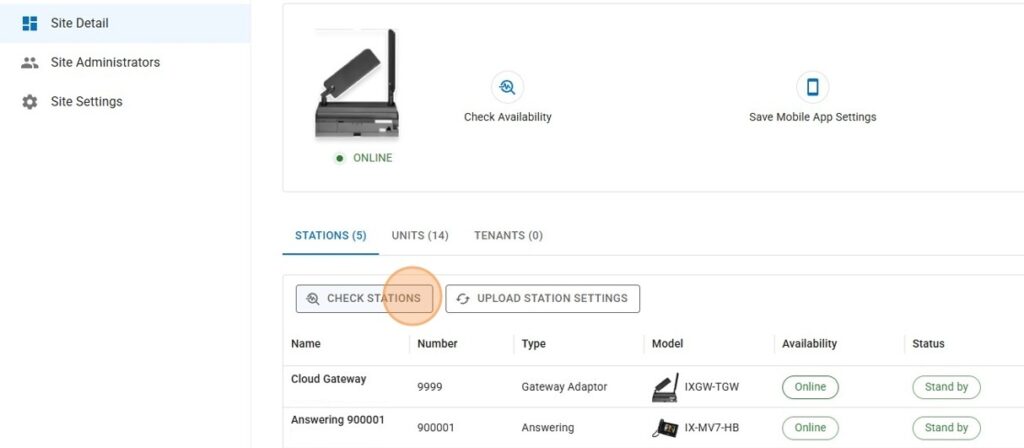
This will remove the tenant from Remote Management, but the settings will need to be applied to the IX | IXG Series stations. Click Back to Site Detail.
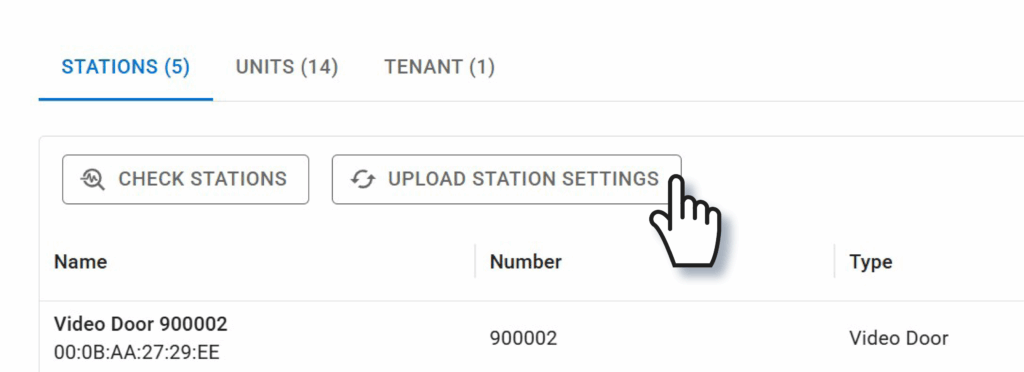
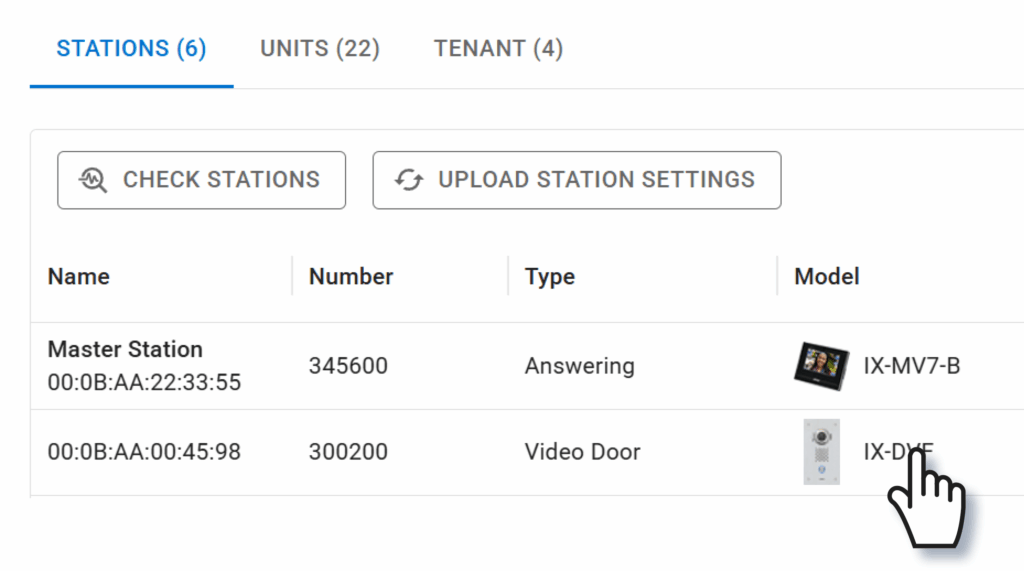
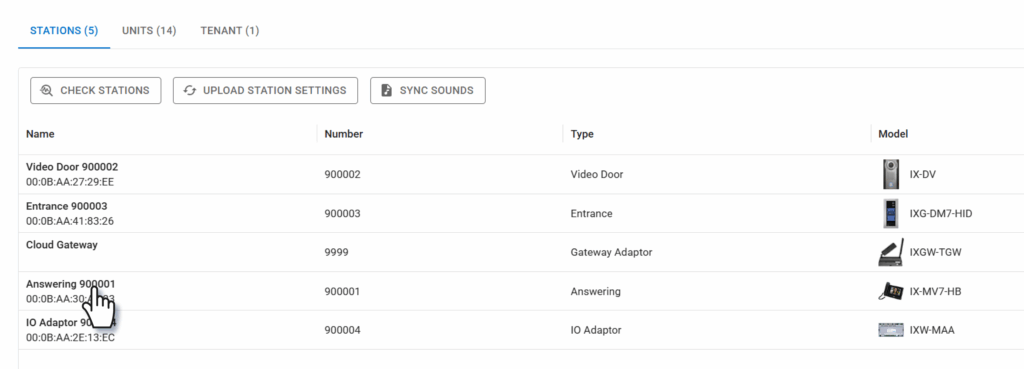
Click Check Stations to confirm that the stations are online and able to be accessed by AiphoneCloud.
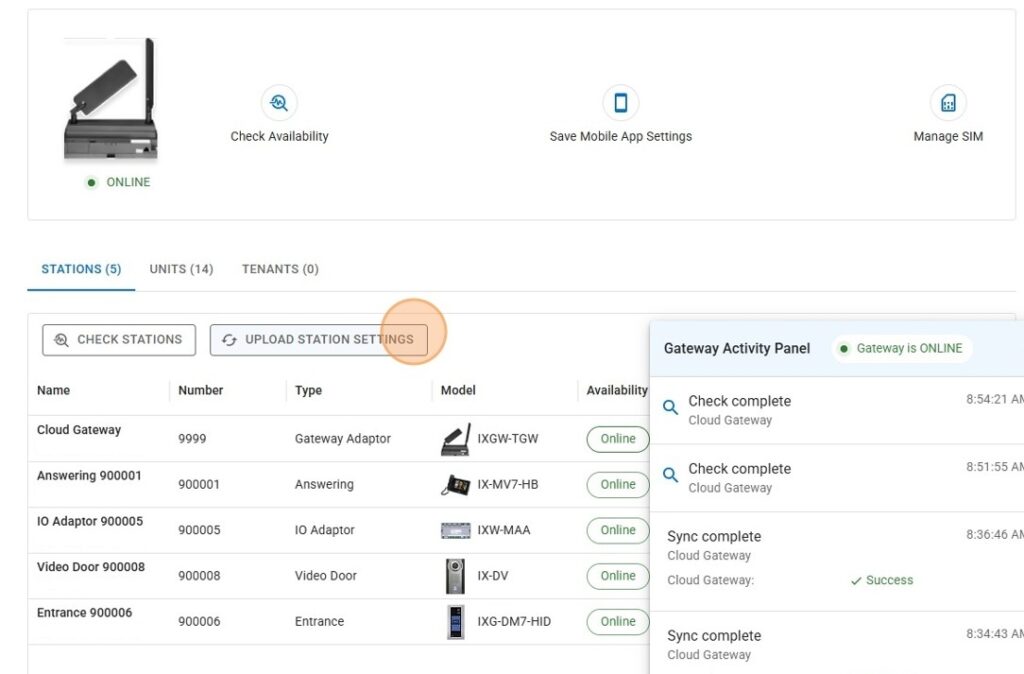
If they pass the checks, click Upload Station Settings. Wait for the upload process to complete.
After this step, the tenants will be fully removed from the system.
Note: AiphoneCloud and Remote Management are dynamic services, and future updates may change the appearance of some items.
Tip: AiphoneCloud and Remote Management are always being improved, so the interface may appear different than in these screenshots.
Each IXG mobile app, answering station, and entrance station has an address book. The default settings depend on the type of system being configured.
Commercial: All stations in the system are in each stations’ address book.
Multi-Tenant address books are determined by the device or IXG Mobile app’s Building and Unit assignment.
IXG-DM7 entrance stations can call Guard, Residential, and Commercial Units in the same building. IXG-MK guard stations and IXG Mobile apps in Guard Units can call any unit in the same building.
Stations and apps in Residential and Commercial Units can call other stations in their Unit, and any IXG-DM7 and IXG-MK stations in the same building.
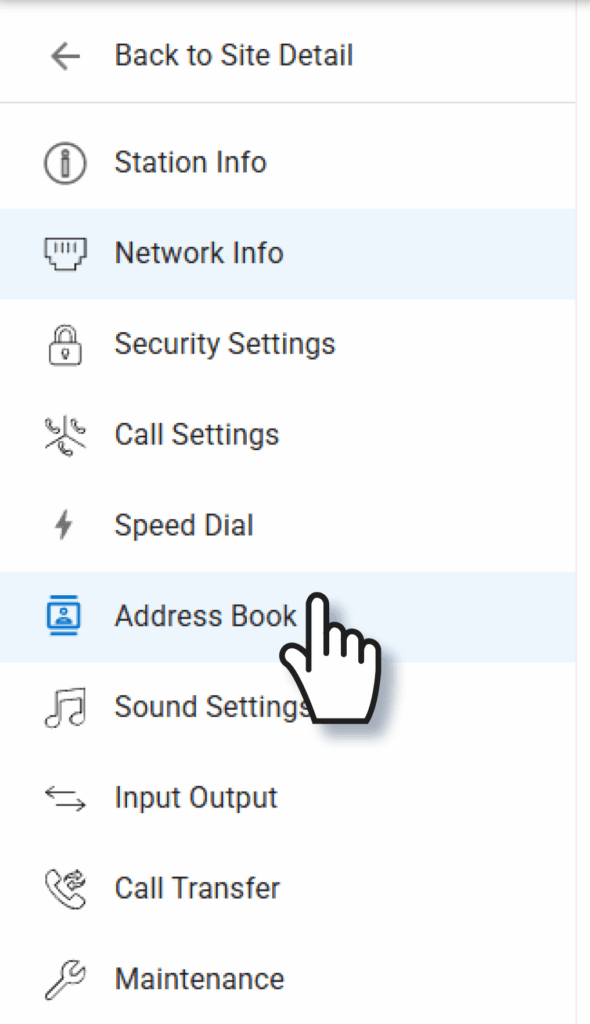
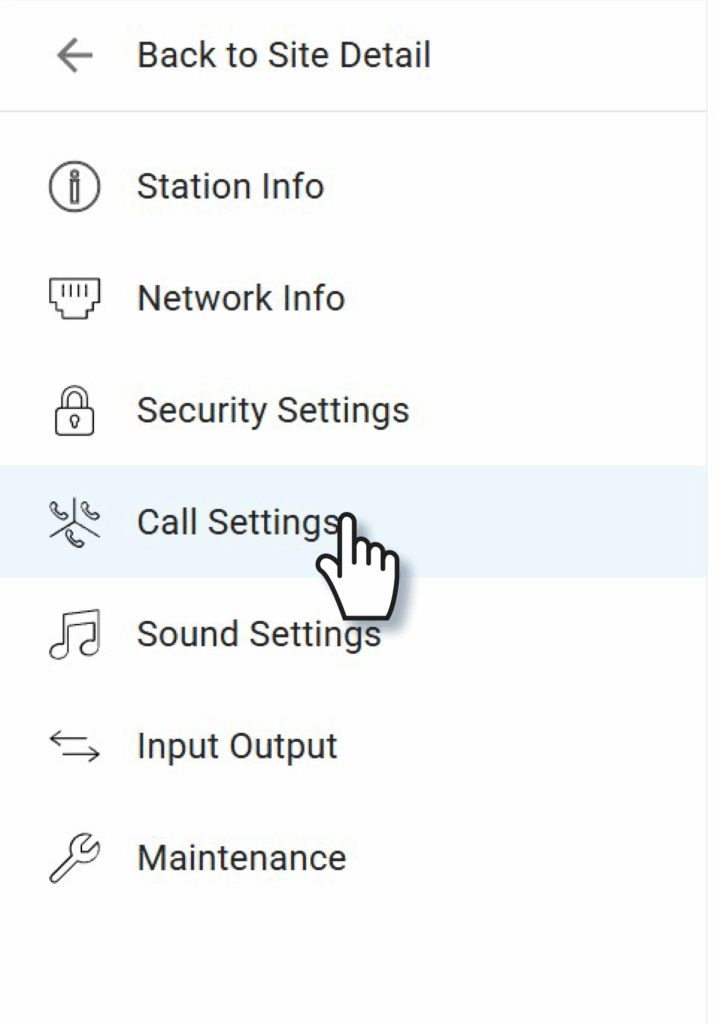
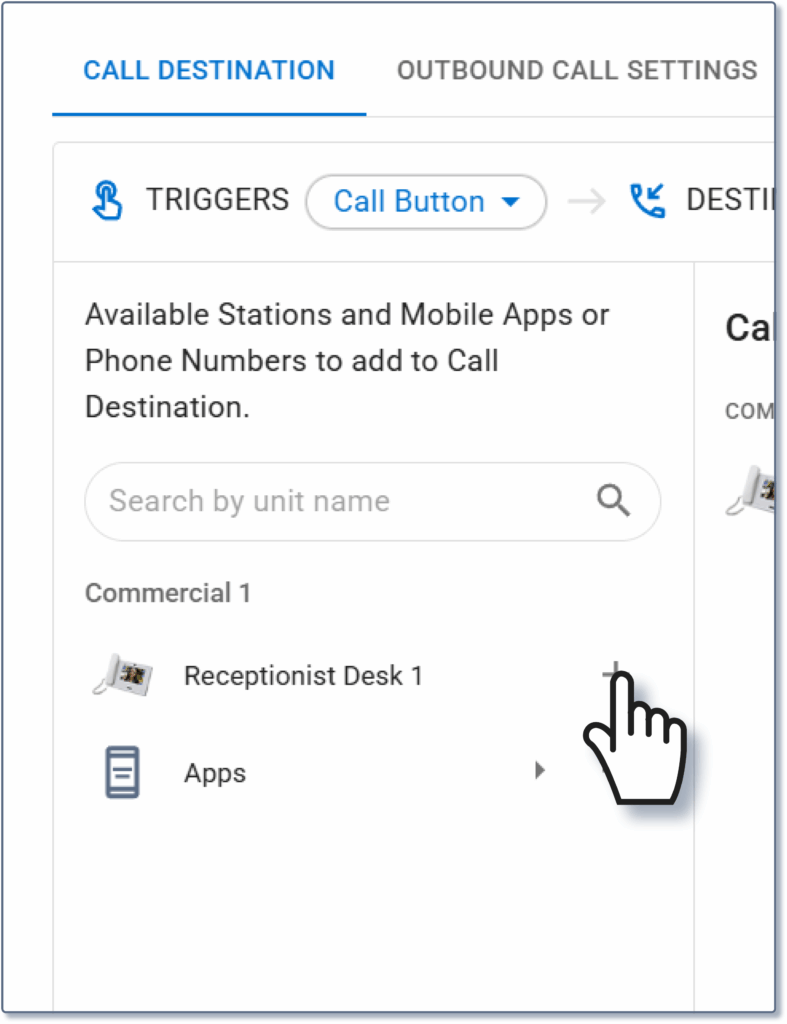
To add or remove stations from an address book, click on the station’s name in the Stations menu.
Click Address Book on the left menu.
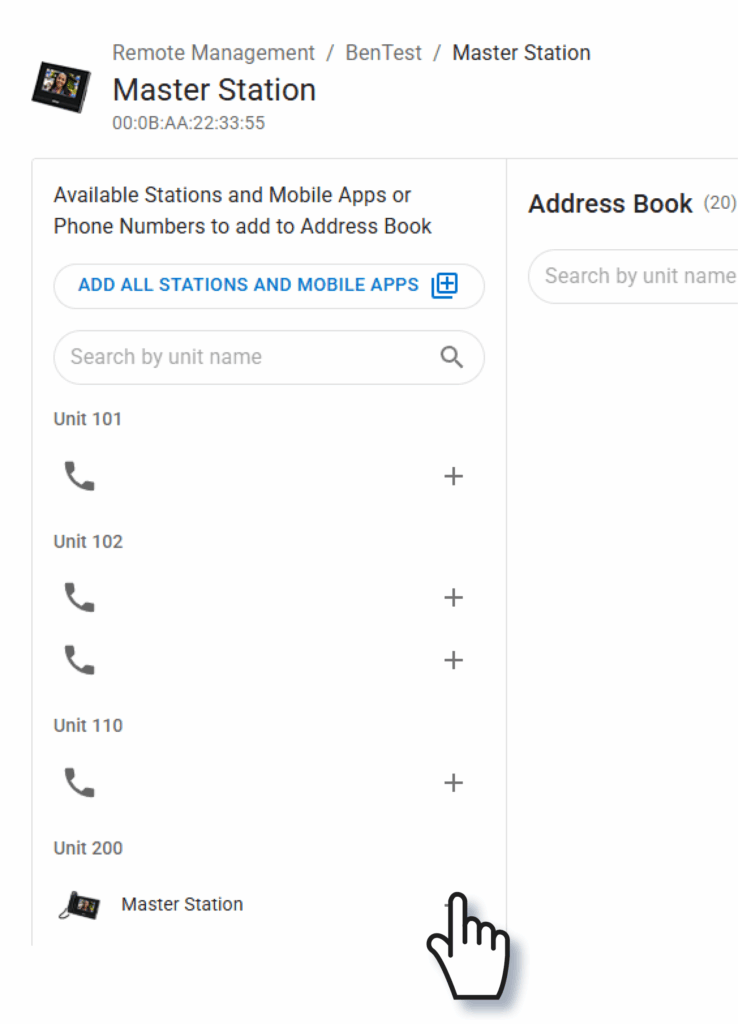
All stations can be added at once by clicking Add All Stations And Mobile Apps. To add stations individually, scroll through the units, stations, or phone numbers on the left and click the + symbol to select a station, phone number, or group of mobile apps.
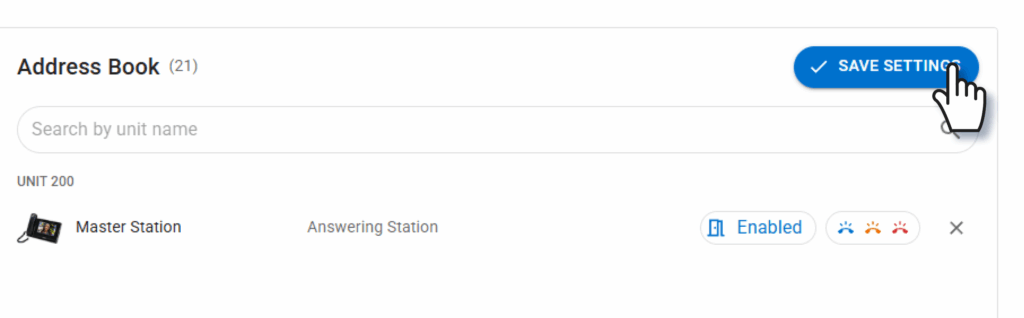
To remove a station that has already been added, click the X symbol to the right. Once the desired stations are in the address book, click Save Settings. Repeat this for all stations that need to have their address books adjusted.
Click Back to Site Detail in the top left to return to the main page. To apply the settings to the stations and apps click Upload Station Settings. If mobile apps are used on the site, also click Save Mobile App Settings.
With that, the stations' address books will be updated.
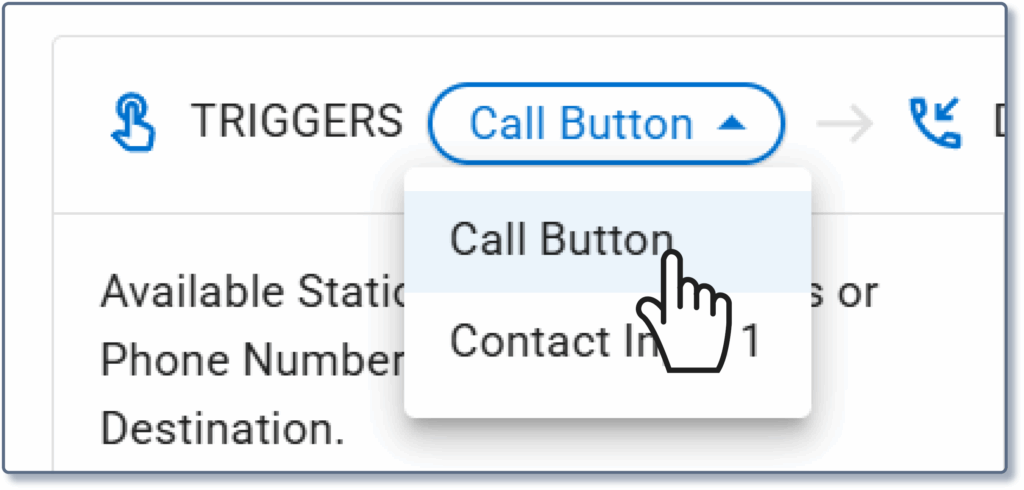
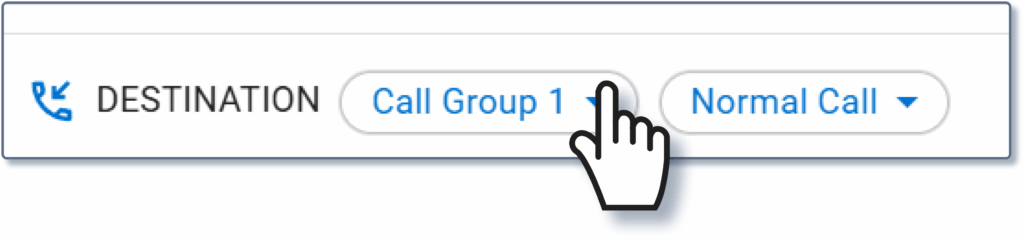
By default, the door station's built-in call button will be selected. If this call will be activated by an external button or other device, click the drop-down menu next to Triggers to select the appropriate input.
By default, the Destination will be set for Call Group 1 at a Normal Call priority. To adjust these, click the drop-down menus next to the word Destination.
Use the search bar or scroll through the list to locate the desired call destinations. Click the + button next to a destination to add it to the door's called stations.
Tip: Onlyone group of mobile apps can be added to the call group, and only one phone number. Up to 20 answering stations can be included.
Review the Call Destination list to the right. To remove a station, click the X symbol next to it. Once everything is configured, click Save Settings to finalize the settings.
Click Back to Site Detail in the top left to return to the main page. Repeat the previous steps for each door station to be configured.
To apply the settings to the stations and apps click Upload Station Settings. If mobile apps are used on the site, also click Save Mobile App Settings.
With this, the stations will be able to communicate with each other as configured.
Tip: AiphoneCloud and Remote Management are always being improved, so the interface may appear different than in these screenshots.
Call transfers allow calls to an answering station to be automatically forwarded to a group of stations and mobile apps. Call transfers are applied whether the incoming call originates from a door, entrance, or another answering station.
Before setting call transfers, make sure that these steps are complete.
Call Settings: Adjust the door stations’ call settings so that it calls the transferring station, but not the transfer destination. This does not need to be done for door stations in the system that should call both simultaneously and not be part of the transfer. (Link)
Address Book: Make sure that the calling door station and the transfer destinations are in the answering station’s address book. The calling station will also need to be in the address book of the transfer destinations to allow for door release. (Link).
To get started, select the Stations menu on the main page and click on the station that will perform the transfer.
Tip: IX-MV7, IX-SOFT, and IXG-MK answering stations can perform transfers. IXG-2C7 and IX-RS stations cannot.
On the next page, click Call Transfer.
Remote Management supports two types of call transfers.
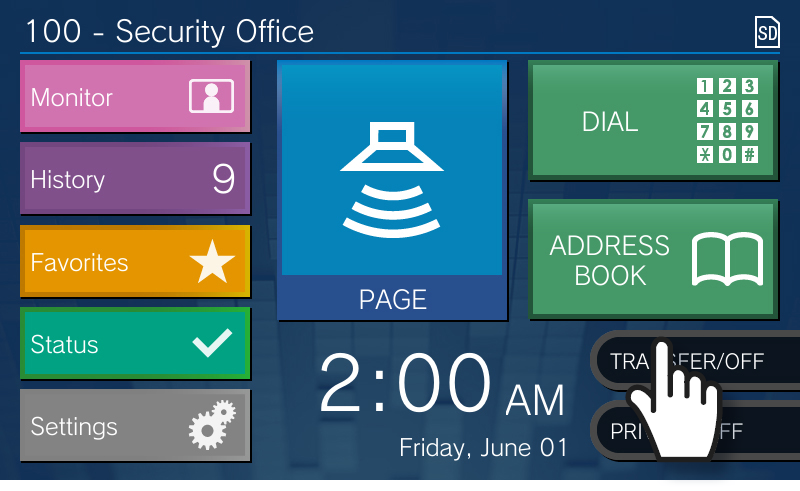
Absent Transfers: The user at the answering station can toggle the transfer on or off. When the transfer is on, incoming calls will instantly be forwarded to the transfer destination(s).
Delay Transfers: A call arrives at an answering station. After a certain length of time, the call is forwarded to the transfer destination(s).
Use the menu to select the type of transfer.
Stations and apps can be found using the search bars or by scrolling down the list beneath Mobile Group. Click the + symbol next to a station or group to add it to the transfer group. Up to 20 destinations can be set.
Tip: Only one group of IXG Mobile apps / Tenant Phone number can be added. Only one VoIP extension can be added. The rest will be answering stations.
After setting the transfer destinations, click the bar next to Enable (Type) Transfer to allow the transfer. If the type is a Delay Transfer, enter it in the appropriate field. To remove a transfer destination, click the X symbol in line with it. Once everything is configured for the transfer settings, click Save Settings.
Tip: IXG-MK guard stations transfer to entire units instead of individual stations. The steps are otherwise the same as on the IX-MV7 shown.
To clear the list, click Reset in the top right corner. Stations can also be removed from the transfer list by clicking the trash can symbol next to them.
Then, click Back to Site Detail in the top left to return to the main page. Repeat these steps for each answering station that will make transfers.
To apply the settings to the stations and apps click Upload Station Settings. If mobile apps are used on the site, also click Save Mobile App Settings.
Delay transfers are active as soon as the upload is complete. Absent transfers are toggled on and off by pressing the Transfer button on the answering station’s home screen.
Both dealers and property managers on a Remote Management site are able to move out tenants.
To get started, navigate to https://aiphone.cloud/remotemanagement and log in with your credentials, including the branch's IXG Portal account, if prompted. If multiple sites are displayed, click the desired site from the list.
On the Site Detail page, click Units to display the unit list.
Click a unit from the list. This will open up a new page.
Under the Tenants submenu, the site’s tenants will be listed. Click Move Out.
A pop-up window will appear, explaining what information will be lost once the tenant is moved out. Click Move Out Tenants to confirm.
This will remove the tenant from Remote Management, but the settings will need to be applied to the IX | IXG Series stations. Click Back to Site Detail.
Click Check Stations to confirm that the stations are online and able to be accessed by AiphoneCloud.
If they pass the checks, click Upload Station Settings. Wait for the upload process to complete.
After this step, the tenants will be fully removed from the system.
Note: AiphoneCloud and Remote Management are dynamic services, and future updates may change the appearance of some items.
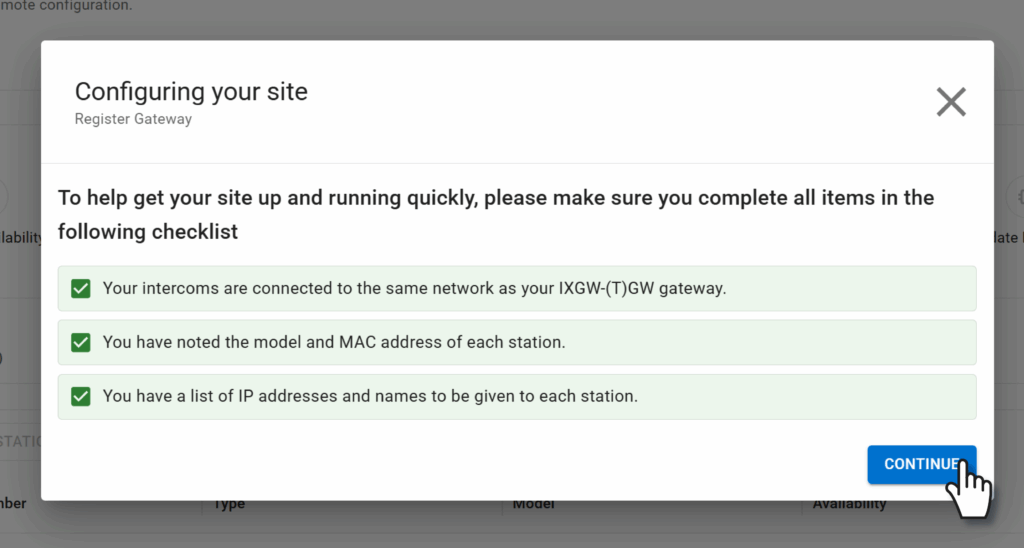
A checklist will appear, verifying that the steps mentioned in the previous article were completed. Make sure they have been and click Continue.
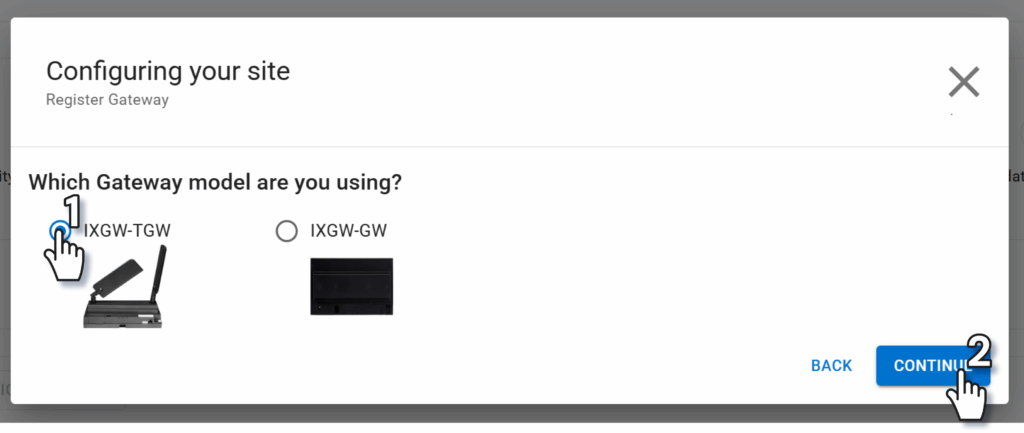
Select the model of gateway, either IXGW-TGW or IXGW-GW and click Continue.
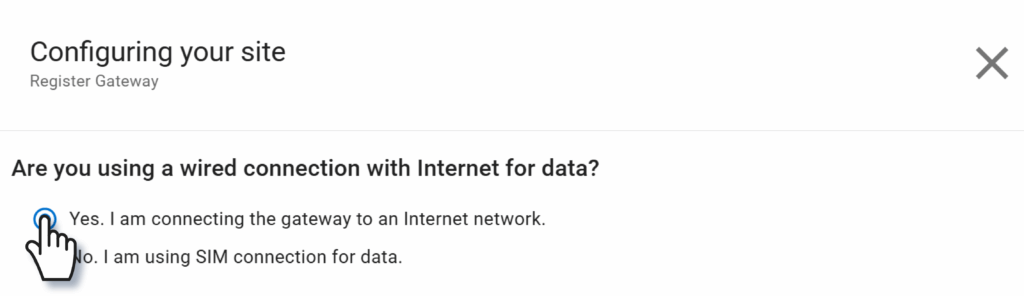
There are two options for how an IXGW-TGW can connect to Remote Management. It can either use the direct ethernet connection via the local network or the built in 4G LTE connection.
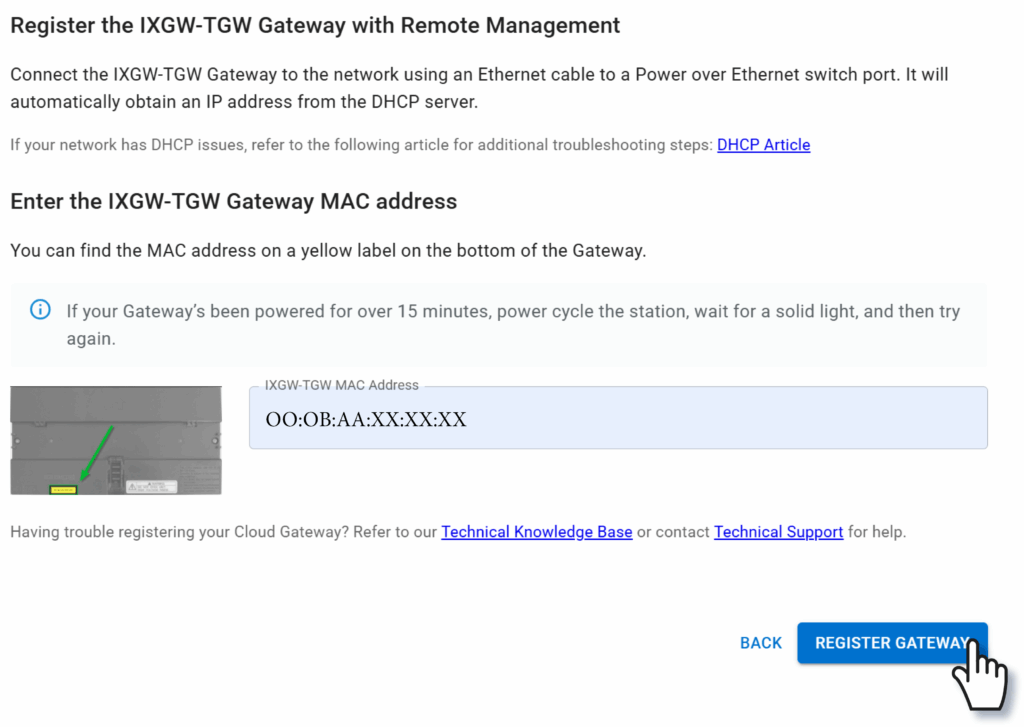
Either way, enter the gateway’s MAC address and click Register Gateway.
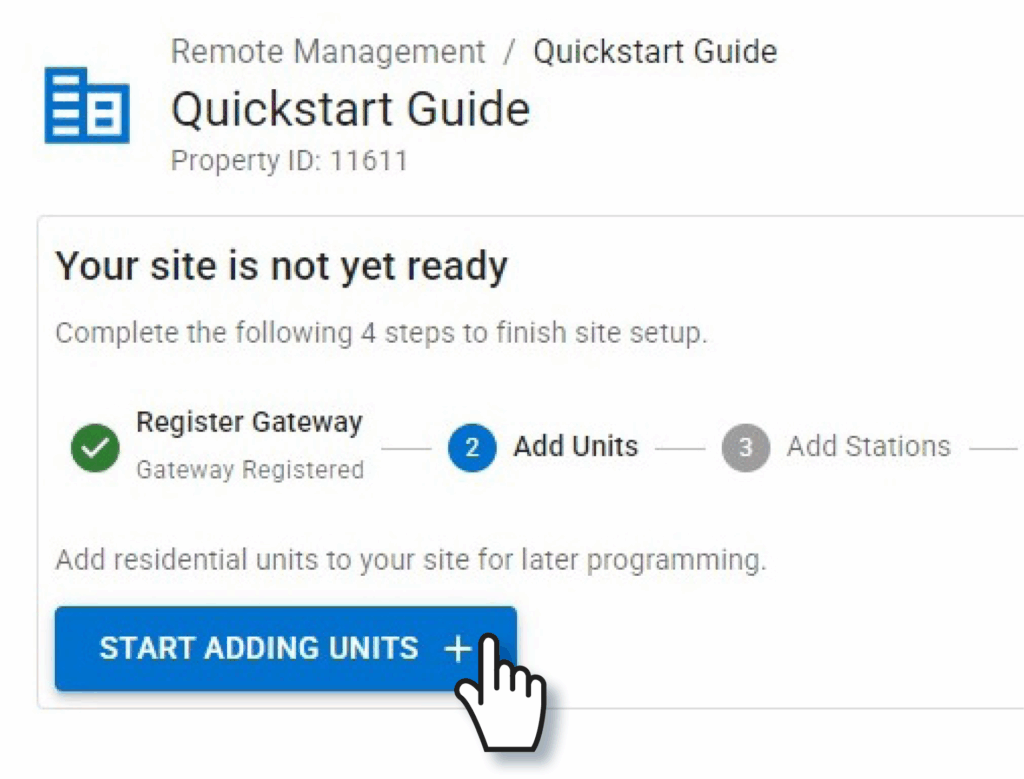
Stations in the system will need to be divided into units. Click Start Adding Units.
Tip: The one exception is the IXW-MAA multi-purpose adaptor. They are not placed in units.
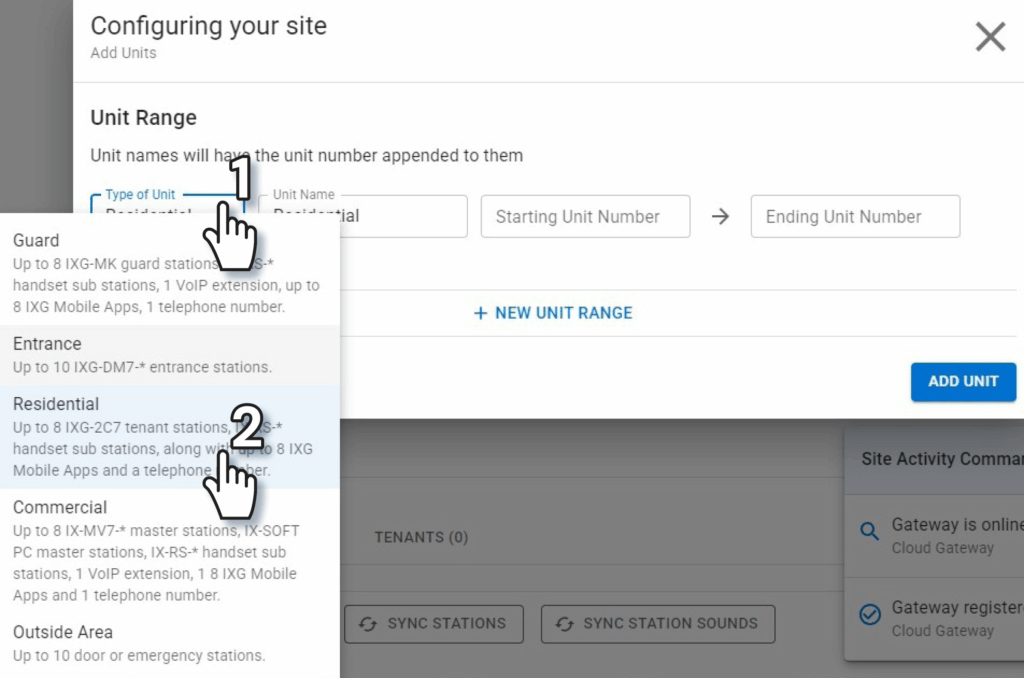
The models of stations will determine what types of units they are added to. Use the drop-down menu under Type of Unit to read the requirements to make a selection. Sites will normally have multiple types of units; select one for the first line.
Tip: It is best practice to make outside areas to house door stations. If they are nested in a commercial, residential, or guard unit, they will only be able to call stations in the same unit.
Then enter a Unit Name, a Starting Unit Number, and an Ending Unit Number. Remote Management will iterate through these to assign the stations their initial information.
Example: If the Unit Name is Office and the range of numbers is 100 to 105, there will be six units created named Office 100, Office 101, and so on.
Tip: If only a single unit of a type is needed, set the starting and ending unit number to be the same.
Click + New Unit Range to repeat the process. This can either be used to create multiple types of units, or to create blocks of units with different unit number ranges.
Once all units are defined, click Add Unit. More units can be added later, if needed.
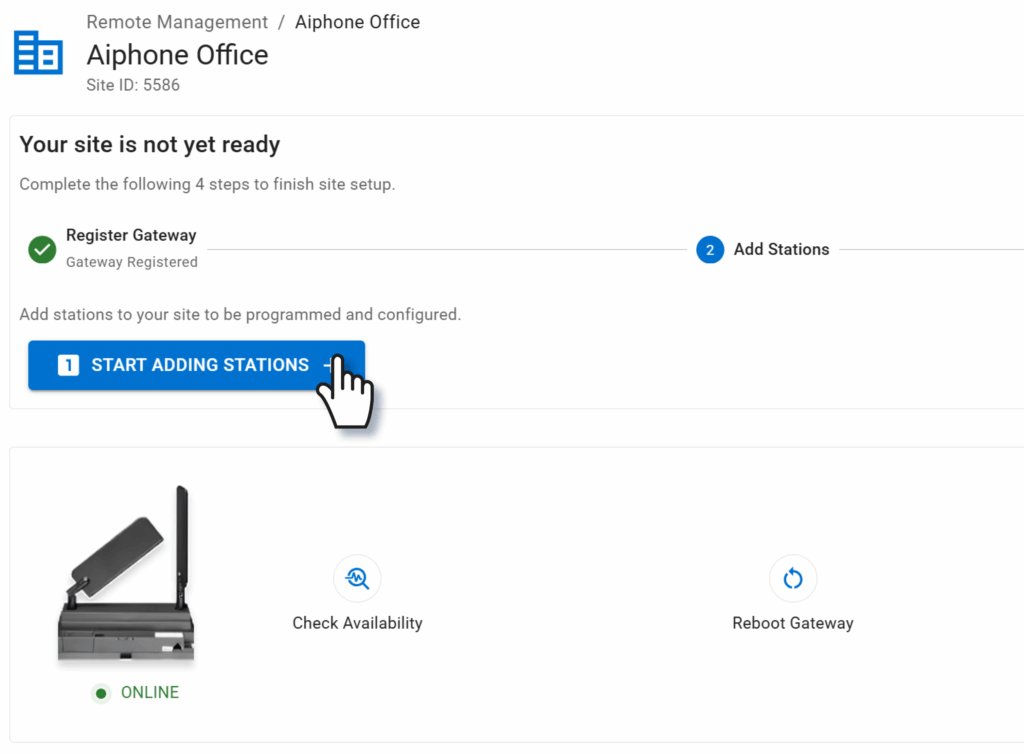
Click Start Adding Stations.
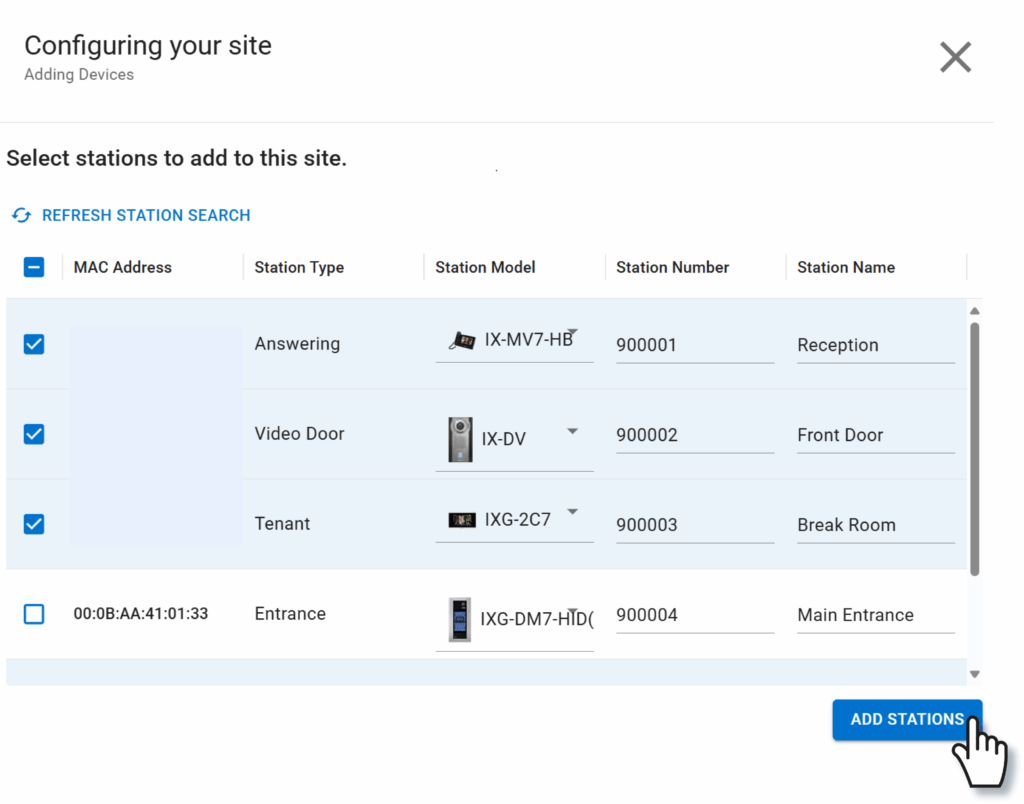
If no stations show up on the new Configuring your site pop-up, click Refresh Station Search. Otherwise, check the found stations that will be added to the site and clickAdd Stations.
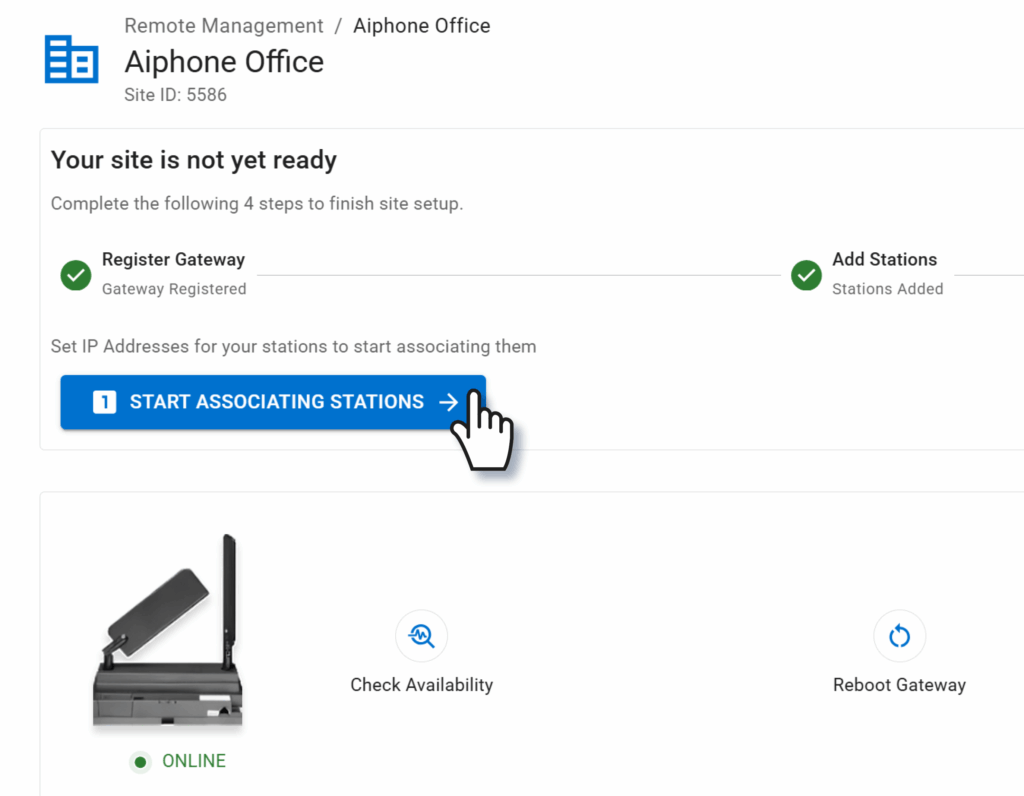
To assign IP addresses to the stations, click Start Associating Stations.
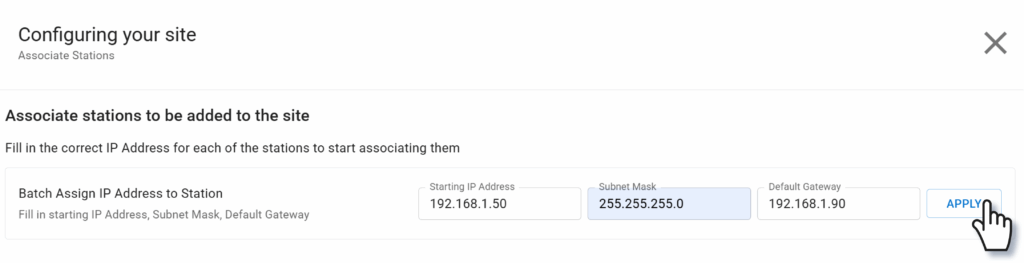
A pop-up window will appear, along with a list of existing stations and their MAC addresses. IP addresses can either be set individually or by batch. Batch IP addressing starts with a chosen IP address, then adds one to the address for each station.
Example: If the starting IP address is 192.168.1.10, the next IP address will end in .11, then .12, and so on.
To assign via batch, enter the first IP address and subnet mask in the range, then click Apply.
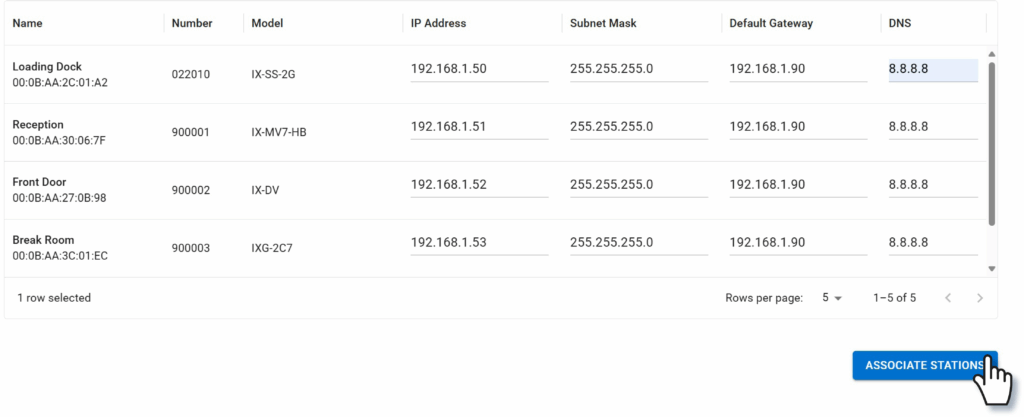
Otherwise, click in line with each station to enter the information station by station.
Enter an IP address and subnet mask for each station using the desired method. A Default Gateway or DNS can be set if required for the site; consult the network administrator with any questions.
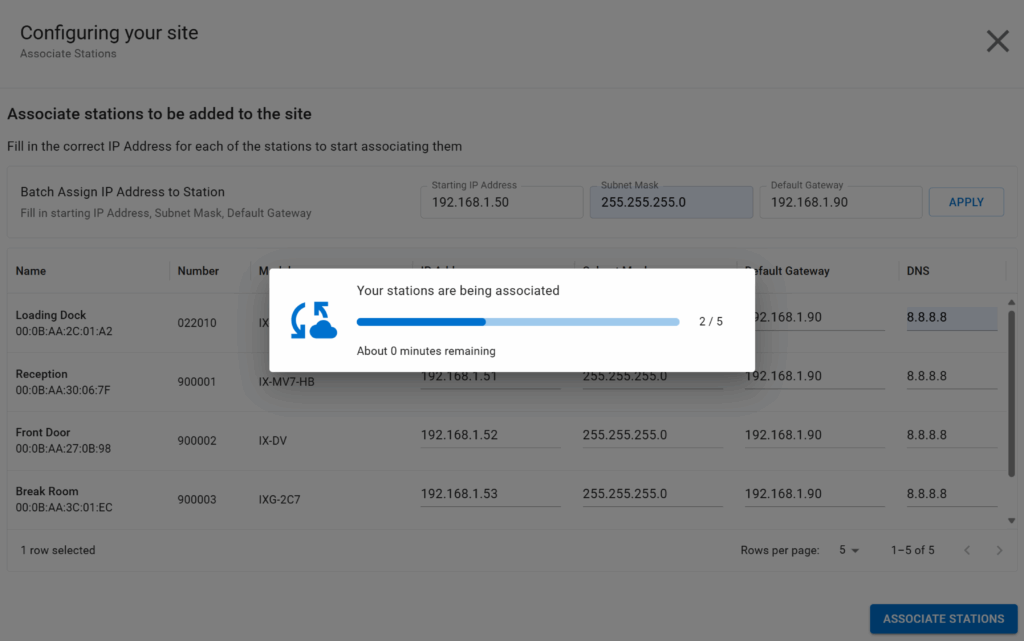
Once the IP addresses have been set, click Associate Stations. The stations will be associated one at a time; this will apply the IP address to the station, causing it to reboot.
Tip: A station reboot takes several minutes. Do not unplug or interrupt a station during this process.
Once all stations are associated, they will need to be placed in their units. Click Start Assigning Stations to Units.
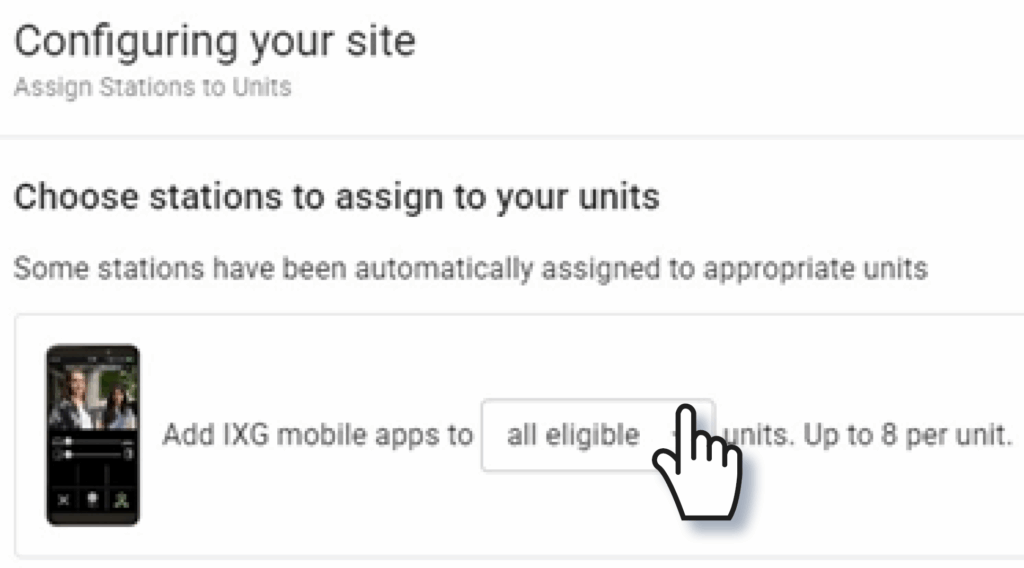
Use the drop-down menu next to the image of a smartphone to to select which unit types will have apps assigned to them, if any.
Under Available Stations, check off the of stations that will be assigned to the same unit. Find the desired unit in the menu to the right and click Assign. Repeat this for all stations to be assigned and click Save Changes.
Tip: If the Assign button does not appear, either too many stations have been selected, or the selected station models that cannot exist in the same unit.
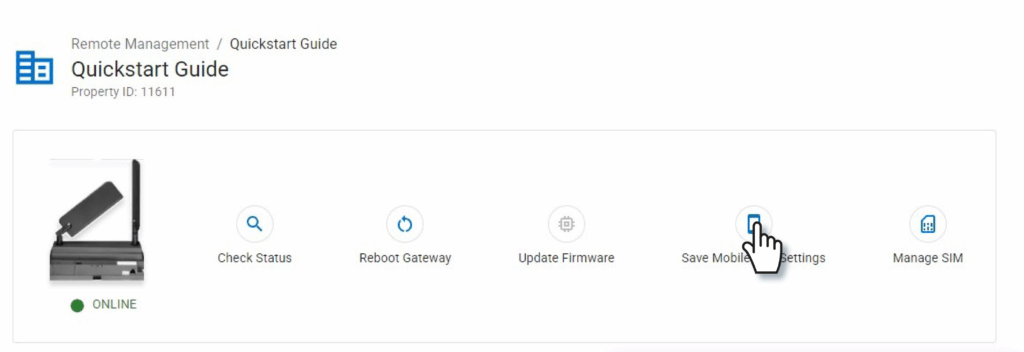
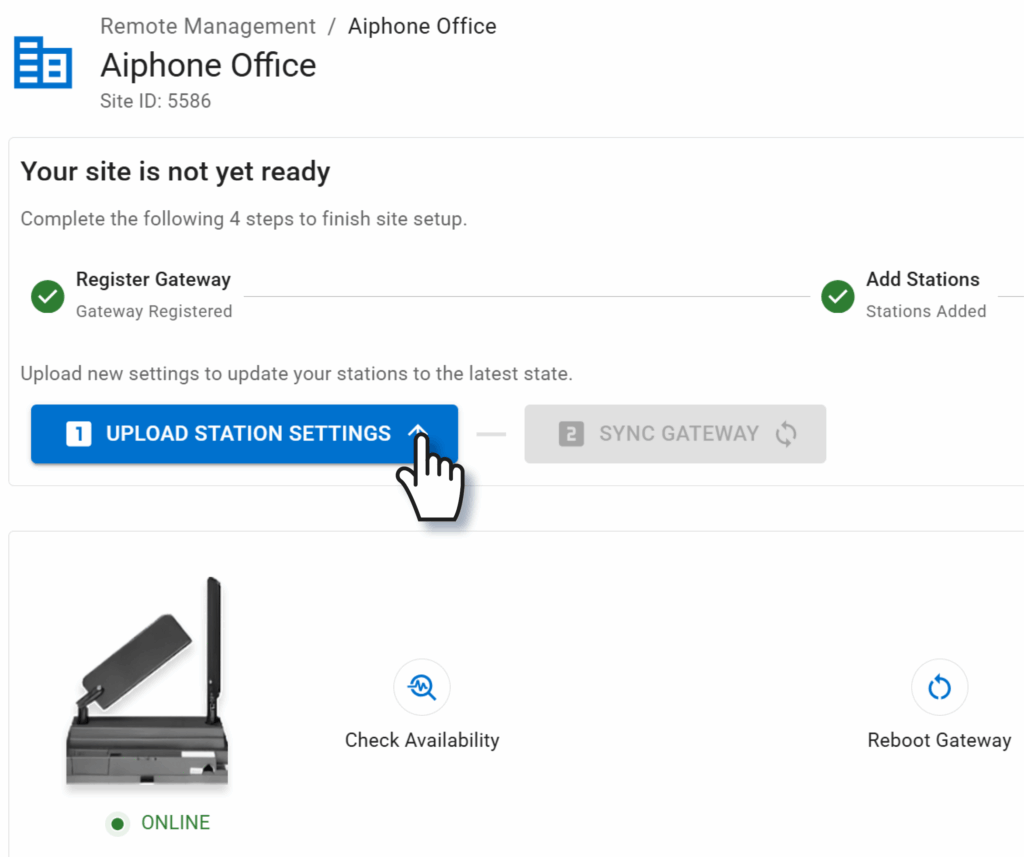
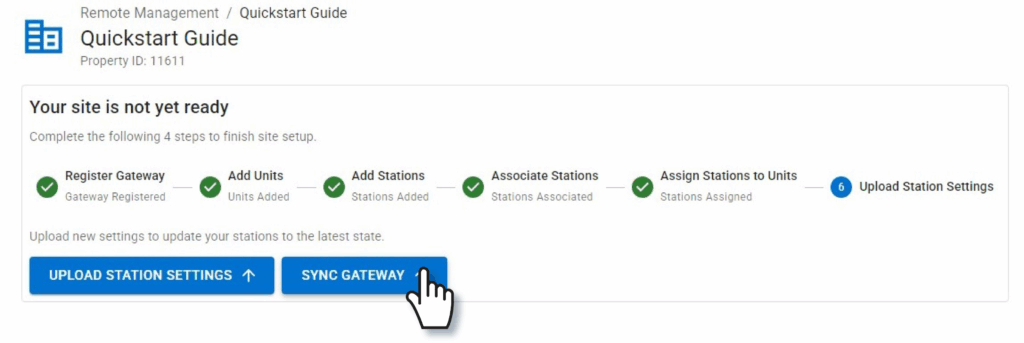
Click Upload Station Settings to apply the settings to the stations. The time taken will vary based on the size of the system.
This will complete the upload to stations. To finish registering IXGW-TGW with the portal, click Sync Gateway.
Once the sync is complete, a success message will appear in the top right of the screen. If IXG mobile apps were used, click Save Mobile App Settings.
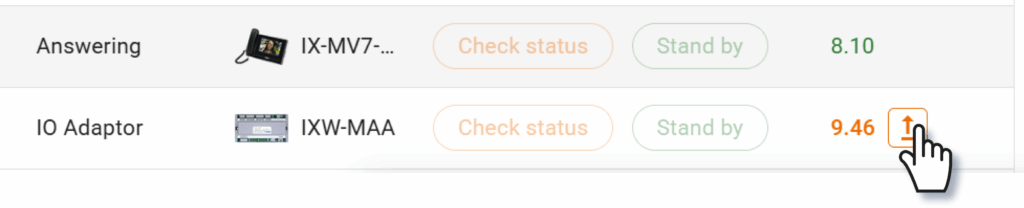
If any stations have out of date firmware after the settings upload, the Update Firmware button next to the station will be clickable. Do so during a time when the stations will not be in use, as this process will take several minutes for each station.
Tip: During a firmware update, absolutely do not unplug or reboot any stations. Doing so can cause permanent damage to the stations.