NWP_Query Object
(
[query] => Array
(
[post_type] => kb
[post__not_in] => Array
(
[0] => 36756
)
[tax_query] => Array
(
[0] => Array
(
[taxonomy] => kbtopic
[field] => slug
[terms] => programming-is-series
)
)
[posts_per_page] => 4
[orderby] => rand
)
[query_vars] => Array
(
[post_type] => kb
[post__not_in] => Array
(
[0] => 36756
)
[tax_query] => Array
(
[0] => Array
(
[taxonomy] => kbtopic
[field] => slug
[terms] => programming-is-series
)
)
[posts_per_page] => 4
[orderby] => meta_value_num menu_order
[error] =>
[m] =>
[p] => 0
[post_parent] =>
[subpost] =>
[subpost_id] =>
[attachment] =>
[attachment_id] => 0
[name] =>
[pagename] =>
[page_id] => 0
[second] =>
[minute] =>
[hour] =>
[day] => 0
[monthnum] => 0
[year] => 0
[w] => 0
[category_name] =>
[tag] =>
[cat] =>
[tag_id] =>
[author] =>
[author_name] =>
[feed] =>
[tb] =>
[paged] => 0
[meta_key] =>
[meta_value] =>
[preview] =>
[s] =>
[sentence] =>
[title] =>
[fields] => all
[menu_order] =>
[embed] =>
[category__in] => Array
(
)
[category__not_in] => Array
(
)
[category__and] => Array
(
)
[post__in] => Array
(
)
[post_name__in] => Array
(
)
[tag__in] => Array
(
)
[tag__not_in] => Array
(
)
[tag__and] => Array
(
)
[tag_slug__in] => Array
(
)
[tag_slug__and] => Array
(
)
[post_parent__in] => Array
(
)
[post_parent__not_in] => Array
(
)
[author__in] => Array
(
)
[author__not_in] => Array
(
)
[search_columns] => Array
(
)
[meta_query] => Array
(
[relation] => OR
[0] => Array
(
[key] => mkb_tax_order_5727
[compare] => EXISTS
)
[1] => Array
(
[key] => mkb_tax_order_5727
[compare] => NOT EXISTS
)
)
[order] => ASC
[ignore_sticky_posts] =>
[suppress_filters] =>
[cache_results] => 1
[update_post_term_cache] => 1
[update_menu_item_cache] =>
[lazy_load_term_meta] => 1
[update_post_meta_cache] => 1
[nopaging] =>
[comments_per_page] => 50
[no_found_rows] =>
[taxonomy] => kbtopic
[term] => programming-is-series
)
[tax_query] => WP_Tax_Query Object
(
[queries] => Array
(
[0] => Array
(
[taxonomy] => kbtopic
[terms] => Array
(
[0] => programming-is-series
)
[field] => slug
[operator] => IN
[include_children] => 1
)
)
[relation] => AND
[table_aliases:protected] => Array
(
[0] => wp_term_relationships
)
[queried_terms] => Array
(
[kbtopic] => Array
(
[terms] => Array
(
[0] => programming-is-series
)
[field] => slug
)
)
[primary_table] => wp_posts
[primary_id_column] => ID
)
[meta_query] => WP_Meta_Query Object
(
[queries] => Array
(
[0] => Array
(
[key] => mkb_tax_order_5727
[compare] => EXISTS
)
[1] => Array
(
[key] => mkb_tax_order_5727
[compare] => NOT EXISTS
)
[relation] => OR
)
[relation] => OR
[meta_table] => wp_postmeta
[meta_id_column] => post_id
[primary_table] => wp_posts
[primary_id_column] => ID
[table_aliases:protected] => Array
(
[0] => wp_postmeta
[1] => mt1
)
[clauses:protected] => Array
(
[wp_postmeta] => Array
(
[key] => mkb_tax_order_5727
[compare] => EXISTS
[compare_key] => =
[alias] => wp_postmeta
[cast] => CHAR
)
[mt1] => Array
(
[key] => mkb_tax_order_5727
[compare] => NOT EXISTS
[compare_key] => =
[alias] => mt1
[cast] => CHAR
)
)
[has_or_relation:protected] => 1
)
[date_query] =>
[queried_object] => WP_Term Object
(
[term_id] => 5727
[name] => Programming
[slug] => programming-is-series
[term_group] => 0
[term_taxonomy_id] => 5727
[taxonomy] => kbtopic
[description] =>
[parent] => 5725
[count] => 7
[filter] => raw
[term_order] => 2
)
[queried_object_id] => 5727
[request] => SELECT SQL_CALC_FOUND_ROWS wp_posts.ID
FROM wp_posts LEFT JOIN wp_term_relationships ON (wp_posts.ID = wp_term_relationships.object_id) LEFT JOIN wp_postmeta ON ( wp_posts.ID = wp_postmeta.post_id ) LEFT JOIN wp_postmeta AS mt1 ON ( wp_posts.ID = mt1.post_id AND mt1.meta_key = 'mkb_tax_order_5727' )
WHERE 1=1 AND wp_posts.ID NOT IN (36756) AND (
wp_term_relationships.term_taxonomy_id IN (5727)
) AND (
wp_postmeta.meta_key = 'mkb_tax_order_5727'
OR
mt1.post_id IS NULL
) AND ((wp_posts.post_type = 'kb' AND (wp_posts.post_status = 'publish' OR wp_posts.post_status = 'acf-disabled')))
GROUP BY wp_posts.ID
ORDER BY wp_postmeta.meta_value+0 ASC, wp_posts.menu_order ASC
LIMIT 0, 4
[posts] => Array
(
[0] => WP_Post Object
(
[ID] => 36715
[post_author] => 18
[post_date] => 2021-05-05 13:43:57
[post_date_gmt] => 2021-05-05 20:43:57
[post_content] =>
Summary
Steps to reset the IS-CCU to factory default settings.
Solution
The cover of the IS-CCU will need to be removed to access dip switches on a specific PCB.
Step 1
Disconnect power from the IS-CCU and remove its cover. The cover is fastened by two screws on both sides of the control unit that will need to be removed.
Step 2
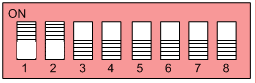
On the XC1304A board located near the Ethernet port, set bit #1 and #1 of SW1 to ON.

Step 3
Connect the PC used to program the system to the IS-CCU and connect power.
Step 4
Set the IP Address of the programming PC to something in the default range of 192.168.0.xxx / 255.255.255.0 and login to the IS-CCU using a web browser and navigate to "https://192.168.0.30". The system username and password are both "aiphone".
Step 5
Within the web interface, under the "Maintenance" menu option found on the left side of the screen, select "Initialization". Selecting this option will return the IS-CCU to its original factory settings.
[mkb-warning]Make sure to set the dip switches back to "Off" before replacing the cover of the IS-CCU[/mkb-warning]
[post_title] => How to factory default an IS-CCU
[post_excerpt] =>
[post_status] => publish
[comment_status] => open
[ping_status] => open
[post_password] =>
[post_name] => how-to-factory-default-an-is-ccu
[to_ping] =>
[pinged] =>
[post_modified] => 2025-10-02 08:01:44
[post_modified_gmt] => 2025-10-02 15:01:44
[post_content_filtered] =>
[post_parent] => 0
[guid] => https://aiphone.local/kb/how-to-factory-default-an-is-ccu/
[menu_order] => 0
[post_type] => kb
[post_mime_type] =>
[comment_count] => 0
[filter] => raw
)
[1] => WP_Post Object
(
[ID] => 36721
[post_author] => 18
[post_date] => 2021-05-05 13:49:04
[post_date_gmt] => 2021-05-05 20:49:04
[post_content] =>
Summary
Steps on how to reset an IS-IP station to factory default settings.
Solution
If the login/password has been changed/lost or you otherwise cannot get into the station, factory reset it by following the steps below.
Step 1
Remove power from the station and remove the back panel from the IS-IP station. Each station has a different PCB with bits that need to be flipped to the ON position, see below:
- IS-IPMV: On the back of the XC1323 board, set bits #1 and #2 of SW700 to ON.
- IS-IPDV(F): On the back of the IX1313 board, set bits #1 and #2 of SW700 to ON.
- IS-IPC: On the main board, set bits #1 and #2 of SW700 to ON.
Step 2
Connect power back to the station. Set the IP address of the programming PC to something in the default range of 192.168.0.xxx / 255.255.255.0 and log into the IS-IP station by opening a web browser and navigate to "https://192.168.0.40". Continue past the security certificate error and click your desired language setting. Log in using "aiphone" as the username and password.
Step 3
While in Maintenance Mode, no changes can be made to the station, except for using the Initialization button to reset the device back to its factory defaults. The first screen will identify the programmed IP address, which is useful if the device's IP address is not known.
While power is still on, very carefully set bits #1 and #2 of SW700 back to OFF and choose one of the following options:
Option A
If you do not want to factory reset the station, you can power cycle it to return to using the existing program. You can download the setting file by doing the following:
- In the left navigation menu, click Download the setting file.
- In the right frame, click the Download button.
- Choose a suitable location, name the file, and then click OK.
- Check Network setting: Common to verify the integrity of the configuration file, which can be corrupted during the Maintenance mode procedure. If the fields in the "Network setting: Common" page are blank.
- If this occurs, you will have to set the device to factory default, as there is no way to manually repair the corrupt configuration file. Proceed to Option B below to resolve this issue. Turn off the unit and replace the cover.
Option B
If you wish to
factory default the device, do the following:
- In the left navigation menu click Initialization
- In the right frame, click the Initialize button
- When the message appears asking "Are you sure?", click OK.
- After 2 minutes have passed, turn off the unit and replace the cover.
[post_title] => How to Factory Default an IS-IP Station
[post_excerpt] =>
[post_status] => publish
[comment_status] => open
[ping_status] => open
[post_password] =>
[post_name] => how-to-factory-default-an-is-ip-station
[to_ping] =>
[pinged] =>
[post_modified] => 2025-10-02 08:03:03
[post_modified_gmt] => 2025-10-02 15:03:03
[post_content_filtered] =>
[post_parent] => 0
[guid] => https://aiphone.local/kb/how-to-factory-default-an-is-ip-station/
[menu_order] => 0
[post_type] => kb
[post_mime_type] =>
[comment_count] => 0
[filter] => raw
)
[2] => WP_Post Object
(
[ID] => 36727
[post_author] => 18
[post_date] => 2021-05-05 13:38:32
[post_date_gmt] => 2021-05-05 20:38:32
[post_content] =>
Summary
Steps on how to download the System Log for troubleshooting purposes.
Solution
To download the system log data, do the following:
- Access the IS-CCU or Host/Client unit via web browser.
- Click System Log in the table of contents on the left side of the window.
- Click Download to open the log data. The log data will open in a txt file format.
- Save that file to your PC using a memorable file name.
[post_title] => Downloading IS Series System Log Files
[post_excerpt] =>
[post_status] => publish
[comment_status] => open
[ping_status] => open
[post_password] =>
[post_name] => downloading-is-series-system-log-files
[to_ping] =>
[pinged] =>
[post_modified] => 2025-10-01 12:02:47
[post_modified_gmt] => 2025-10-01 19:02:47
[post_content_filtered] =>
[post_parent] => 0
[guid] => https://aiphone.local/kb/downloading-is-series-system-log-files/
[menu_order] => 0
[post_type] => kb
[post_mime_type] =>
[comment_count] => 0
[filter] => raw
)
[3] => WP_Post Object
(
[ID] => 36728
[post_author] => 18
[post_date] => 2021-05-05 13:37:49
[post_date_gmt] => 2021-05-05 20:37:49
[post_content] =>
Summary
Steps to download and upload setting files from an IS-IP station.
Solution
Downloading a Setting File
- Open a web browser and enter "https://" followed by the IP address of the device into the address bar.
- Click past the security certificate error, select a language, and login to the device using the admin ID and password.
- From the left hand side menu, click "Downloading the Setting File" and then click the Download button.
- Save the file.
Uploading a Setting File
- Open a web browser and enter "https://" followed by the IP address of the device into the address bar.
- Click past the security certificate error, select a language, and login to the device using the admin ID and password.
- From the left hand side menu, click "Uploading the setting file" and then click the Upload button.
- Click the Browse button and navigate to an existing setting file, click Ok.
- With the browse field filled out with the correct information, click the Upload button.
- A red message "settings are not applied until you click the Update button." will appear at the top of the screen. Do not proceed to Updating the system yet, instead go to "Network Setting: Individual" and confirm that the network settings are correct.
[mkb-info]The configuration file will typically have an IP address assignment outside the range of your network, be sure to change this address to something that makes sense for the network it is connected to (or will be connected to), then click Temporarily stored.[/mkb-info]
[post_title] => Downloading and Uploading Setting Files
[post_excerpt] =>
[post_status] => publish
[comment_status] => open
[ping_status] => open
[post_password] =>
[post_name] => downloading-and-uploading-setting-files
[to_ping] =>
[pinged] =>
[post_modified] => 2025-10-01 12:01:12
[post_modified_gmt] => 2025-10-01 19:01:12
[post_content_filtered] =>
[post_parent] => 0
[guid] => https://aiphone.local/kb/downloading-and-uploading-setting-files/
[menu_order] => 0
[post_type] => kb
[post_mime_type] =>
[comment_count] => 0
[filter] => raw
)
)
[post_count] => 4
[current_post] => -1
[before_loop] => 1
[in_the_loop] =>
[post] => WP_Post Object
(
[ID] => 36715
[post_author] => 18
[post_date] => 2021-05-05 13:43:57
[post_date_gmt] => 2021-05-05 20:43:57
[post_content] =>
Summary
Steps to reset the IS-CCU to factory default settings.
Solution
The cover of the IS-CCU will need to be removed to access dip switches on a specific PCB.
Step 1
Disconnect power from the IS-CCU and remove its cover. The cover is fastened by two screws on both sides of the control unit that will need to be removed.
Step 2
On the XC1304A board located near the Ethernet port, set bit #1 and #1 of SW1 to ON.
Step 3
Connect the PC used to program the system to the IS-CCU and connect power.
Step 4
Set the IP Address of the programming PC to something in the default range of 192.168.0.xxx / 255.255.255.0 and login to the IS-CCU using a web browser and navigate to "https://192.168.0.30". The system username and password are both "aiphone".
Step 5
Within the web interface, under the "Maintenance" menu option found on the left side of the screen, select "Initialization". Selecting this option will return the IS-CCU to its original factory settings.
[mkb-warning]Make sure to set the dip switches back to "Off" before replacing the cover of the IS-CCU[/mkb-warning]
[post_title] => How to factory default an IS-CCU
[post_excerpt] =>
[post_status] => publish
[comment_status] => open
[ping_status] => open
[post_password] =>
[post_name] => how-to-factory-default-an-is-ccu
[to_ping] =>
[pinged] =>
[post_modified] => 2025-10-02 08:01:44
[post_modified_gmt] => 2025-10-02 15:01:44
[post_content_filtered] =>
[post_parent] => 0
[guid] => https://aiphone.local/kb/how-to-factory-default-an-is-ccu/
[menu_order] => 0
[post_type] => kb
[post_mime_type] =>
[comment_count] => 0
[filter] => raw
)
[comment_count] => 0
[current_comment] => -1
[found_posts] => 6
[max_num_pages] => 2
[max_num_comment_pages] => 0
[is_single] =>
[is_preview] =>
[is_page] =>
[is_archive] => 1
[is_date] =>
[is_year] =>
[is_month] =>
[is_day] =>
[is_time] =>
[is_author] =>
[is_category] =>
[is_tag] =>
[is_tax] => 1
[is_search] =>
[is_feed] =>
[is_comment_feed] =>
[is_trackback] =>
[is_home] =>
[is_privacy_policy] =>
[is_404] =>
[is_embed] =>
[is_paged] =>
[is_admin] =>
[is_attachment] =>
[is_singular] =>
[is_robots] =>
[is_favicon] =>
[is_posts_page] =>
[is_post_type_archive] => 1
[query_vars_hash:WP_Query:private] => 0899c5ac77687c02cf155c8fc2695e75
[query_vars_changed:WP_Query:private] => 1
[thumbnails_cached] =>
[allow_query_attachment_by_filename:protected] =>
[stopwords:WP_Query:private] =>
[compat_fields:WP_Query:private] => Array
(
[0] => query_vars_hash
[1] => query_vars_changed
)
[compat_methods:WP_Query:private] => Array
(
[0] => init_query_flags
[1] => parse_tax_query
)
[query_cache_key:WP_Query:private] => wp_query:034f834880e9ee90dbf9caf08e3bdaab
)